|
Silicone Impression Material in the Middle Ear
Kipp Robins, M.D.
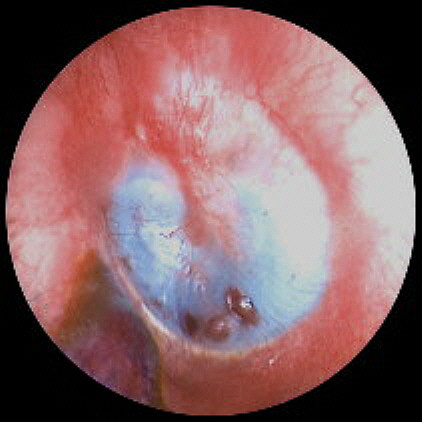
A 91 year old male was seen by a local hearing aid specialist for hearing aids in May, 1998. The hearing aid specialist took ear impressions using silicone material injected using a gun. Details on the use of an ear dam are unavailable . According to the patient, the specialist placed the tip of the gun deeply into the ear canal and kept injecting silicone. The impression material, injected under pressure, apparently perforated the tympanic membrane and filled the majority of the tympanic cavity AND the auditory tube. The patient was seen subsequently by a local Otolaryngologist (Dr. Robins) to remove the solidified impression from the tympanic cavity. During the initial visit an image (Fig. 1) was recorded using an in-office video otoscope system. A traumatic perforation can be seen in the inferior portion of the tympanic membrane. The patient was scheduled for surgical removal of the tympanic cavity impression and a series of emulsion photographs (Figs. 2 - 12) were recorded before, during and after surgery. The otolaryngologist reported that the silicone material had almost completely filled the tympanic cavity and that the material was wrapped around the ossicular chain on three sides and also filled the auditory tube. The material was removed without physical damage to the ossicular chain.
Figure 1. Video otoscopic image of "tympanic cavity impression" The vivid blue cast visible through the tympanic membrane in Figure 1 is the residual silicone impression material filling the middle ear space in intimate contact with the medial surface of the TM. Injection of the material caused a traumatic inferior perforation of the tympanic membrane and subsequently filled the tympanic cavity. Note the hematoma in anterior inferior auditory meatus, probably traumatically induced by the injection gun tip placement.
Figure 2. Photo taken in operating room prior to surgery The risks of surgery were discussed with the patient and family. These risks included possible disruption of the ossicular chain. injury to the tympanic membrane or the inner ear. Both patient and family desired to proceed with the surgical removal of the impression material. Figure 2 was taken 24 hours after Fig.1, via a surgical microscope using emulsion photography. Some separation of the impression material from the medial surface of the TM is noted. The following photographs, operative and follow-up notes were provided by otolaryngologist Dr. Robins. Surgical Procedure: The patient was taken to the operating room, on May 7, 1998, where general endotracheal anesthesia was induced without complication. The left ear was prepped and draped in the usual sterile fashion. Under microscopic visualization, an extended tympanomeatal flap was made. This extended from the superior aspect of the drum posteriorly down to approximately 7 o’clock. The drum was elevated forward. Further photo documentation was obtained at this point (Figure 3). The KTP laser was used at a setting of 2 watts to attempt to cut and dissect the silicon. This seemed to heat the silicon, but did not appear to be effective at cutting. The myringotomy knife was used to make several slices through the silicon inferiorly where it was felt to be safe. Ultimately, the straight-cut forceps were found to be best for removal of the silicon piecemeal. It did break away without significant tension using the straight-cut forceps. 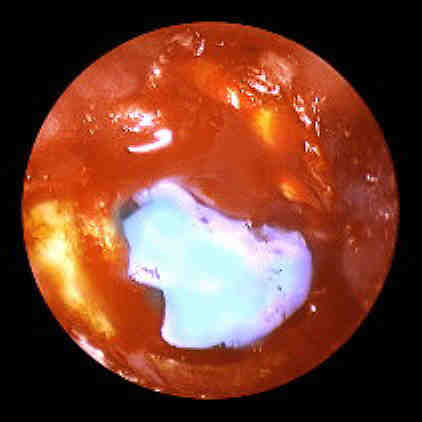 Figure 3. Initial surgical exposure shows residual It was initially felt visually that the incudostapedial complex was encased in silicon. As the silicon was retracted inferiorly from this area, however, it was seen that the silicon extended to/and abutted against the incudostapedial complex but did not surround and encase the ossicles. The ossicular chain was therefore able to be kept intact throughout the procedure. All posterior and inferior areas of the tympanum were able to be cleaned of the silicon using this piecemeal removal. At this point additional photographs (Figures 4-6) were taken.
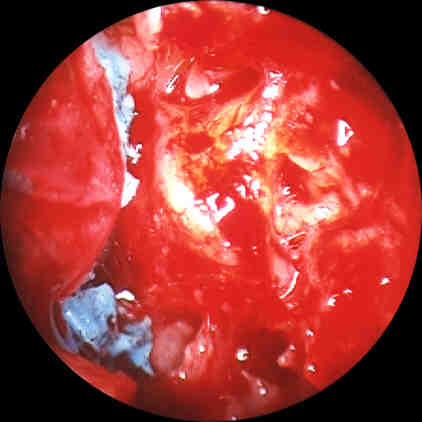
Figure 4. Material excised from posterior and inferior tympanum Click image for full size view. The anterior tympanum was still filled with the rubber material This was not able to be retrieved deep to the malleus. Further extension of the incision anteriorly allowed the drum to be retracted posteriorly and the remainder of the silicon was able to be removed in this fashion. 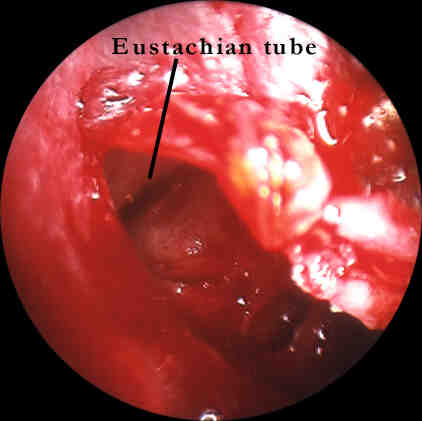
Figure 5. Material has been removed from anterior tympanum and Eustachian tube. Click image for full size view. There was an extension which appears to have gone down into the eustachian tube which came out as a single large piece. 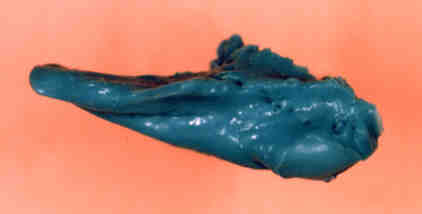 Impression material cast of the Eustachian tube, removed intact.
At this point, the tympanic membrane was replaced to its original position. A Gelfilm graft was placed over the inferior perforation and some of the macerated areas of the drum.
Figure 7. Tympanic membrane replaced in original position.
Post-Operative follow up notes: 05/18/98 S - No problems with the ears since surgery. O - Left ear packing still in place. Everything looks appropriate at this time. R - Recheck in one month. 07/03/98 - No problems since last visit. 0 - Right ear remains healthy. Packing from the left ear canal is removed. The eardrum is well visualized. The posterior annulus appears to have retracted somewhat from its canal, leaving two separate posterior; perforations between bony wall and annulus. R - We will watch these. I will see him back in 2 months. I did approve wearing a hearing aid now in both ears. There is, incidentally, a small fleck of silicone still deep in the eardrum, which should not have any bad consequences. 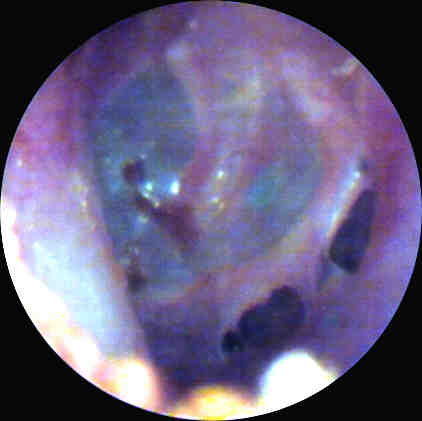 Figure 8. Postop color-edited photo taken 7-3-98 showing annulus 09/04/98 S - No problems since last visit. He is having some troubles properly putting his hearing aid in on the right. There was apparently a malfunction of his left hearing aid and it is being fixed. 0 - Right eardrum healthy. Left eardrum now has one smaller perforation posteroinferiorly. The annulus remains pulled away from the bony [meatus]. I again photographed it today. R - Recheck three months. I again gave him approval to wear a hearing aid on the left.  Figure 9. Post-operative color-edited photo taken 9-4-98 03/17/99 S - No reported problems since last visit. His step-son comes in again with him today. 0 - Right ear healthy. Left ear has otorrhea. On further questioning, he states that he has noticed some moisture in the ear canal for quite sometime. I suctioned this. He now again has two perforations, but they are much smaller than before. I am uncertain whether the single perforation that he had last time has now closed centrally creating two much smaller holes. R - Cipro drops for four days. Recheck two weeks. It sounds as if they have signed a contract with the adjuster at ************ ending all payments. This is certainly not appropriate until the eardrum is back to its pre-trauma state. 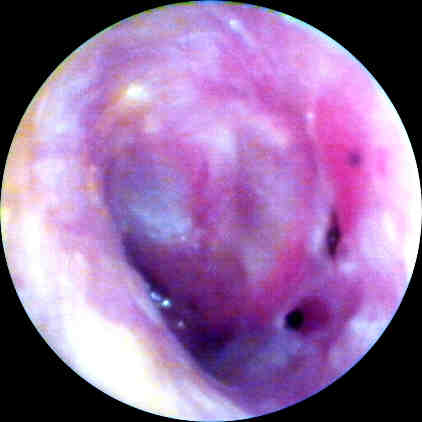 Figure 10. Post-operative color-edited photo taken 3-17-99. Click image for unedited full size view. 03/31/99 S - No otorrhea since last visit. He has been faithful in using the drops. O - One of the two small holes is now gone. The inferior hole has enlarged. I photographed this (Figure 11). R - Drops twice a week. Recheck two months still with the hopes that the perforations will close spontaneously. 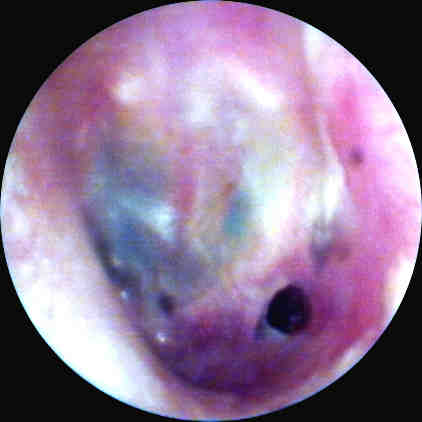 Figure 11. Postop photo taken 3-31-99. 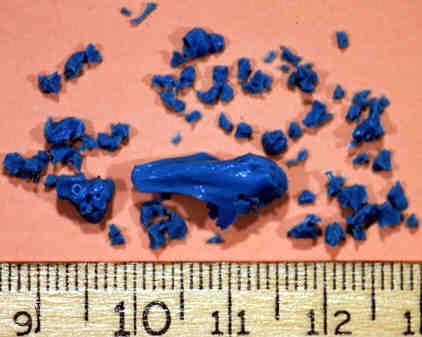 Figure 12. Remnants of silicone impression material |